The Maths, The Code, and The Problem
Welcome.
I’ve been dabbling with picom the compositor. That means it does magic X11 things to make
your windows look nicer, such as drop shadows, transparency and, today’s topic of interest, animations. As said in the title this is gonna involve maths and that is scary to some, but I assure you this is fun! Hopefully.
The Goal
During my short stint as a sane person, I began daily driving macOS insted of ArchLinux. The user experience and out-of-box experiance were good, but in the end it just wasn’t for me; compared to my “tuned to my workflow” Arch setup it felt lacking.
After switching back to Arch I did miss some features, most notably the window animations and the overall “feel” of using the desktop. My aim was to bring this to my setup on Arch via picom1.
The Problem
I immediately ran into problems around how picom animations for moving, resizing, and dragging windows work in bspwm2.
The problem is that picom doesn’t have specific triggers for resizing or moving windows; it all has to be done by the same animation.
My first thought was “just use the preset animation geometry”, which is configured like so:
1animations =(
2    ...
3    {
4        triggers = [ "geometry" ];
5        preset = "geometry-change";
6        duration = 0.2;
7    }
8)
Now I would show you a video of the result of this, however I cannot be bothered, so I shall explain instead. This function is constant time, meaning that no matter how small the move or tiny the window geometry changes are, the animations will always last for the duration defined in the configuration.
This sounds fine, and it is fine for moving window positions on screen, but it absolutely breaks when resizing windows. As you drag a window, this animation is triggered many times a second, and of course it takes x seconds to finish that animation of the tiny move. This leads to resizes lagging heavily behind where your mouse is, which just looks horrible and feels mushy.
What we need is a time function that scales relative to how big the move is.
The Code
As a precursor to the maths, we need some code.
My initial plan was to use the geometry-change preset. However, annoyingly, it uses saved-image-blend. This means it takes a screenshot of the window before the scale and fades it to the window post-scale, which leads to some very odd results, namely that the blend is very jarring if a window is being shrunk. This is a horrible effect and I’d rather skip it.
As I understand it, the reason saved-image-blend is implemented this way is the animations get applied after the window scales or moves. If a window shrinks, this leads to the small window being stretched to play the animation, like so:
saved-image-blendsaved-image-blendAfter digging around the picom source, I found the presets config. The geometry-change preset looks like this:
 1geometry-change = {
 2    scale-x = {
 3        curve = "cubic-bezier(0.07, 0.65, 0, 1)";
 4        duration = "placeholder0";
 5        start = "window-width-before / window-width";
 6        end = 1;
 7    };
 8    scale-y = {
 9        curve = "cubic-bezier(0.07, 0.65, 0, 1)";
10        duration = "placeholder0";
11        start = "window-height-before / window-height";
12        end = 1;
13    };
14    shadow-scale-x = "scale-x";
15    shadow-scale-y = "scale-y";
16    offset-x = {
17        curve = "cubic-bezier(0.07, 0.65, 0, 1)";
18        duration = "placeholder0";
19        start = "window-x-before - window-x";
20        end = 0;
21    };
22    offset-y = {
23        curve = "cubic-bezier(0.07, 0.65, 0, 1)";
24        duration = "placeholder0";
25        start = "window-y-before - window-y";
26        end = 0;
27    };
28    saved-image-blend = {
29        duration = "placeholder0";
30        start = 1;
31        end = 0;
32    };
33    shadow-offset-x = "offset-x";
34    shadow-offset-y = "offset-y";
35    *knobs = {
36        duration = 0.4;
37    };
38    *placeholders = ((0, "duration"));
39};
After removing the saved-image-blend section I have something akin to what I want, but there are still problems to solve.
The Maths
After some thought, I came to the conclusion that this would be best solved with a distant dependant duration function. Time to deal with that pesky thing.
Before we get into the maths, it’s worth mentioning that all of this was made far more difficult due to the limited set of mathematical operators provided by Picom: add (+), subtract (-), multiply (*), divide (/), and exponent (^). Many of the sums would’ve been a lot easier if we had operators such as abs(x) or sqrt(x)
First off, we need to figure out how far a given window is being moved:
x_diff='window-x - window-x-before'
y_diff='window-y - window-y-before'
diff='x_diff + y_diff'
This is a bit naive as window positions start in a corner (I can’t remember which corner, but it doesn’t matter). This makes calculating the move distance for windows translating away from this origin easy, but breaks for windows moving closer as the move distance is negative.
We’re going to dive into some moderately complex maths now, but I’ll do my best to explain as I go, so bear with me.
What we need is an abs(x) function. I spent a good deal of time researching how to do this. I knew I could do:
I felt so stupid only now remembering this. Raising a value to the power of a fraction is equvilent to the root with the same base as the fraction. A simple example of this is:
\[ \sqrt{x} = x^{\frac{1}{2}} \]With that in mind, we can now build our own abs(x) function:
In laymans terms, this is simple: Squaring x will always yield a positive value because any positive squared is always positive, and any negative squared is also always positive. Since square root is the inverse of squared, we can now get the square root of x to determine the absolute value of x.
My idea is to make a function that has a dead space where the animations for small moves are virtually instant, and animations for all larger moves that exceed the dead space last effectively the same amount of time.
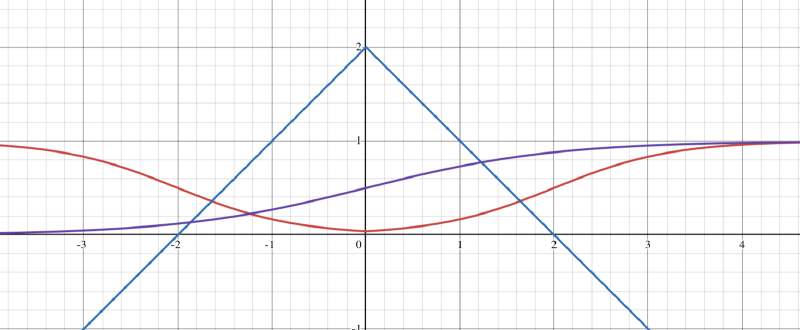
A function that may come to mind is the sigmoid function, usually presented like so (operating on x-axis).
\[ y = \frac{1}{1+e^{-x}} \]It can be refactored to remove e and turned into a function. In simple terms, if we substitute e for a bigger number (I chose 5), the transition becomes “steeper”. You can see an example of this with the red line depicted in the figure below.
Steepening the transition reduces the already miniscule chances of encountering an abnormal animation duration (more on this later).
Anyway, the final form looks like this:
\[ sigmoid(dist\_mov) = \frac{1}{1+5^{dist\_mov}} \]In this form, when dist_mov is negative, the output is effectively one, and when dist_mov is positive, it’s effectively zero. This is the essence of the sigmoid function.
Now that we have a sigmoid function, we can put everything together to calculate how long an animation should last based on the distance a window is moved:
\[ \begin{aligned} sigmoid(dist\_mov) &= \frac{1}{1+5^{dist\_mov}} \\ abs(x) &= (x^2)^{\frac{1}{2}} \\ anim\_time(dist\_mov) &= sigmoid(-abs(dist\_mov)) \\ \end{aligned} \]I lobbed my calculations into desmos for a nice visual representation:
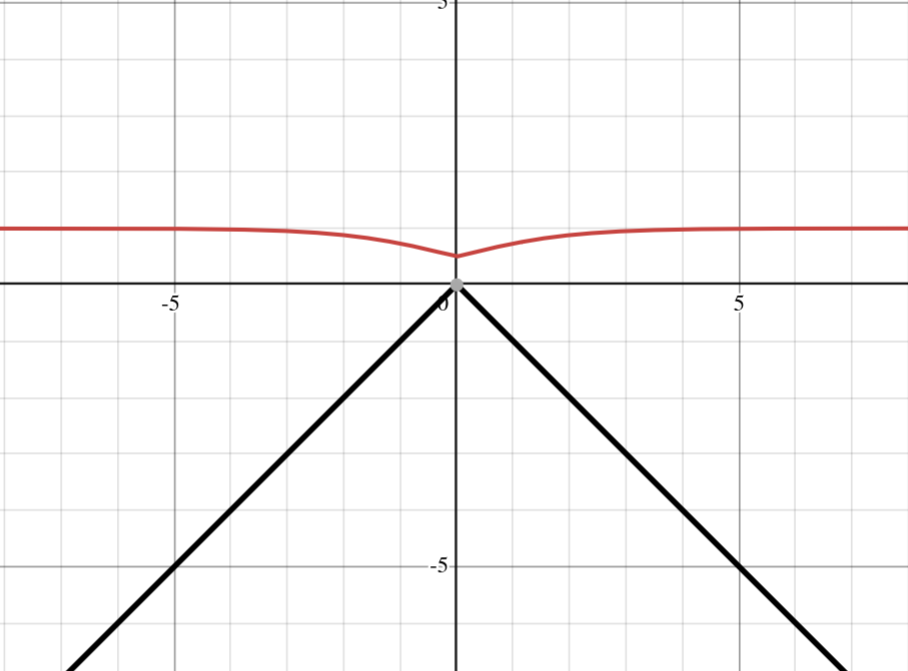
Honestly, this is not exactly what I wanted, but it makes sense. To understand why this didn’t turn out as I’d hoped, let’s try substituting the input value for the highest possible value of the abs function (which is zero and will give the lowest sigmoid value). We’ll then simplify down to a value:
\[ \begin{aligned} sigmoid(dist\_mov) &= \frac{1}{1+5^{dist\_mov}} \\ sigmoid(0) &= \frac{1}{1+5^0} \\ sigmoid(0) &= \frac{1}{1+1} \\ sigmoid(0) &= \frac{1}{2} \\ sigmoid(0) &= 0.5 \end{aligned} \]The value I was hoping for here is 0, not 0.5. To achieve this, we need the abs function to have a higher posible value. Remember the sigmoid function needs a positive value to return 0 (our dead space), but on our current graph, the abs function is always negative. A quick way to achieve this is to just add a value (dead_space) then simplify down again:
\[ \begin{aligned} anim\_time(dist\_mov) &= sigmoid(-abs(dist\_mov)+dead\_space) \\ anim\_time(dist\_mov) &= sigmoid(dead\_space-abs(dist\_mov)) \end{aligned} \]In a visual representation, we can see a clear difference in how this affects the dead space:
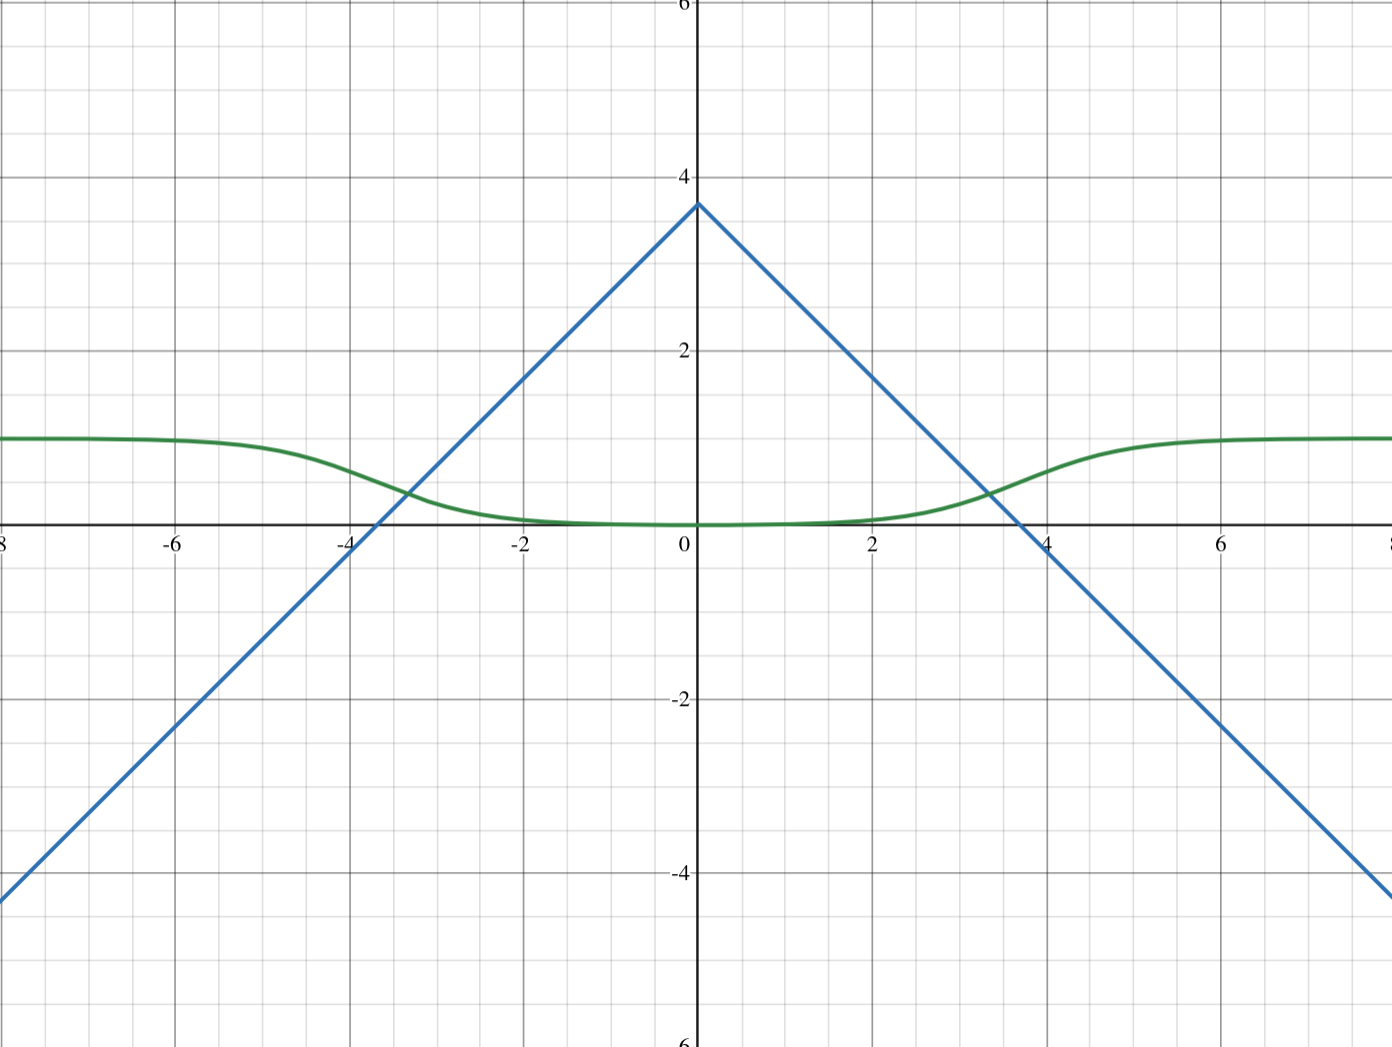
Great success!
Essentially, when anim_time is calculated as zero, the animation duration is zero, and when it’s one, the animation lasts as long as defined in animation_target_duration (more on this later), however when anim_time is between zero and one, the animation duration is anim_time*animation_target_duration. This is what I previously referred to as an “abnormal animation duration”
After converting these calculations to a picom animation script, we get this:
1dead_space = 350;
2animation_target_duration=0.2
3x-diff-abs = "(((window-x-befor - window-x)^2)^0.5)";
4y-diff-abs = "(((window-y-befor - window-y)^2)^0.5)";
5anim-duration = "animation_target_duration*(1/(1+(5^(dead_space - (x-diff-abs + y-diff-abs)))))";
This kinda works, however I’ve now discovered a new issue where the window-x and window-y are relative to the top left corner of the window, which doesn’t seem like a problem but consider this setup where we have a tall, very narrow window adjacent to a tall, wide window:

The issue is that if I were to swap these two windows’ locations, our function would calculate this as a tiny move because the top left corners of the windows are not far apart. What we need to do is calculate the centre of the windows, then calculate the difference between the centre of each. Luckly this is simple and gives us our final iteration of the code:
 1{
 2  triggers = [ "geometry" ];
 3  dead_space = 350;
 4  animation_target_duration=0.2
 5  win_x_center_before = "(window-x-before + (window-width-before / 2))"
 6  win_x_center_after = "(window-x + (window-width / 2))"
 7  win_y_center_before = "(window-y-before+(window-height-before / 2))"
 8  win_y_center_after = "(window-y + (window-height / 2))"
 9  x-diff-abs = "(((win_x_center_before - win_x_center_after)^2)^0.5)";
10  y-diff-abs = "(((win_y_center_before - win_y_center_after)^2)^0.5)";
11  anim-duration = "animation_target_duration*(1/(1+(5^(dead_space - (x-diff-abs + y-diff-abs)))))";
12
13  scale-x = {
14      curve = "cubic-bezier(0.33, 0, 1, 0.66)";
15      duration = "anim-duration";
16      start = "window-width-before / window-width";
17      end = 1;
18  };
19  scale-y = {
20      curve = "cubic-bezier(0.33, 0, 1, 0.66)";
21      duration = "anim-duration";
22      start = "window-height-before / window-height";
23      end = 1;
24  };
25  shadow-scale-x = "scale-x";
26  shadow-scale-y = "scale-y";
27  offset-x = {
28      curve = "cubic-bezier(0.33, 0, 1, 0.66)";
29      duration = "anim-duration";
30      start = "window-x-before - window-x";
31      end = 0;
32  };
33  offset-y = {
34      curve = "cubic-bezier(0.33, 0, 1, 0.66)";
35      duration = "anim-duration";
36      start = "window-y-before - window-y";
37      end = 0;
38  };
39  shadow-offset-x = "offset-x";
40  shadow-offset-y = "offset-y";
41  suppressions = ["increase-opacity", "decrease-opacity"]
42
43}
Final Result
The code is good now. Thanks for reading!
Fin
(p.s. thank you very, very much tig)